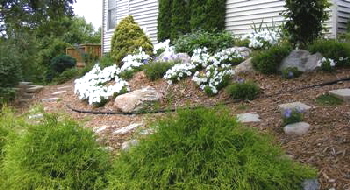
Planting on a Slope
There are a few different methods for planting on a slope or hill, I like to adjust the options based on the slope itself and the plants I want to use.
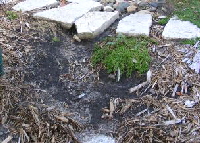
Before you begin planting on a slope it is important to evaluate for erosion problems. If the hill is sodded or already planted the grass and plants are preventing erosion. But often even a planted hill, if steep enough and not properly planted and mulched, will show signs of erosion. Look for;
Exposed tree or shrub roots
Rocks that have surfaced
Small gullies or cracks formed by water runoff
Fine soil deposits at the base of the hill
If the problems are serious you may need professional help. But most situations can be managed fairly well by a homeowner willing to do a little work. And if your hill is sodded, these problems may surface once you remove the sod.
There are a few different things that will help to hold the soil in place, and it is best that you employ all of the methods to eliminate washouts.
Stagger or scatter your plants on the slope. Planting in lines will encourage water to run between rows. Staggering will cause runoff to “hit” a plant and slow down, absorb and disburse.
Control water flow from the top of the hill. If you have any roof drainage at the top of the hill you need to divert it.
Slow water flow and runoff with terracing and contouring.
Hold soil with wide spreading roots and groundcovers.
Divert and scatter the force of heavy rains with plant foliage.
Mulch to reduce surface runoff
Serious runoff problems on steep slopes can by minimized by laying down jute mesh mat over the hill like a landscape fabric. You can cut planting holes as needed.
Evaluate your hill carefully before you proceed with any plan. Think about whether you will need to make minimal or dramatic changes to the slope. Can you walk on the hill or do you have to nearly crawl up or down? You may want to consider major terracing with walls or large boulders if you can’t even walk on the hill. Sometimes these decisions are made based on the plants you hope to use. Appropriate plants, groundcovers and mulch can hold even very steep hills. But maintenance intensive plants such as vegetable gardens, roses, even many shrubs and perennials will require you to easily access the plants. Terracing or bouldered berms may be necessary.
PREPARING THE HILL
After making some basic decisions, you will be ready to start your project. One step at a time, lets start with removing existing sod or plants.
Unfortunately this needs to be either a very slow or a very fast process. Once you remove sod and expose the soil, rain can wash out your soil. You need to decide what will work best for you. I have a long expanse of hill, about 60 feet or more, and parts of it were very steeply sloped. The steep slopes required quick work and heavy labor. So for the heavy labor of hauling in boulders and contouring with a bobcat, I called in professionals to ensure that it could be done in one dry day with a crew and heavy equipment. The rest I have been working on in small manageable pieces.
There are a number of ways to “hold the soil” while you work.

Kill the grass with roundup and leave it in place to hold the soil. I prefer not to use roundup, it can be taken up from the soil by surrounding plants and is adding to the bee kill problem.
Remove all the sod and cover exposed soil with jute or landscape fabric as you complete the work by section.
Remove the sod and just turn it over in place to hold the soil. The dead clumps can be removed in small sections as you are ready to plant.
Remove small sections at a time, only as much as you can complete quickly. Personally I like to work in rather large swaths to achieve a desirable edge shape and contouring of the soil that flows well. I am often working a path of steps into the design to easily access plants for maintenance, so let me give you a better idea of my process.
Work with an easily manipulated garden hose to determine the size and shape of the sod to be removed.
Scalp the grass right down to the dirt, I use a string trimmer. This nearly kills the grass, or at least shocks it badly enough to put it in recovery rather than growth. If you change your mind about the shape, the grass will recover, it will just take some time. Much better alternative to using RoundUp.
Dig the grass up in clumps with a spade and turn them over in place, or use a sod cutter removal tool and turn the strips over.
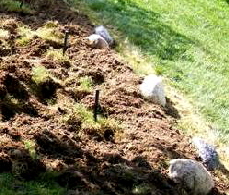
Now you need to do some careful planning around the weather before you remove the sod clumps. You need a stretch of days with no heavy rain to loosen and amend the soil if necessary, contour the soil, add any small boulders, stepping stones or stone steps., plant, and mulch. So before you remove the sod also make sure you have made your plant selections and purchased them, and determine where everything will be planted. I play around with plant placement before I dig the sod. Working on a hill, I usually have to place a rock or stake rather than the potted plants so they don’t roll down the hill. Often I wind up just pushing stakes in where perennials might go and place buckets where small shrubs might go to get good placement. The stakes can stay put through most of the process so you don’t lose track of any careful measurements for spacing you may have made.
At this point I like to purchase my plants and actually place them where I want them. Push in a stake or use a rock to make sure the pot stays put. There are often a few spots I haven’t decided what will work well, sometimes when I start moving actual plants around I may be able to make more decisions. But plants can always be added later.

This is also when you need to decide if you want to contour the slope, creating areas that are more level. You can create soil berms or add boulders and large rocks to help hold soil. Areas where you reduce the slope will create a landing area for water to slow down and soak in. This will help hold moisture on the slope, reduce or eliminate erosion, and planned well can create a flatter spot to plant your larger elements. Not to mention it can create interest to your design. When using rocks and boulders it is critical that they be partially buried, on a steep slope you should bury up to half of the rock. And the downhill side of the rock absolutely must be partially buried or it will simply slip down the hill over time, even a really big one. The largest bolder I have on my hill was not properly buried by a landscaper and it has slid down the hill and is now pushing out the edging. For simple berms with rock and boulders, take a look at the ideas you can incorporate: Creating a Berm.
You still don’t want to remove the sod, go get any soil amendments, topsoil, rocks and edging that you need. You want to have everything ready for dry weather.
Once you come into a weather forecast when little or no rain is expected, or at least definitely no heavy rain, remove the sod. I like to break up the sod clumps just by chopping at it with a spade. You will be amazed at how much usable soil loosens out to be used when leveling and contouring your slope. The rest I use to start a new compost heap.
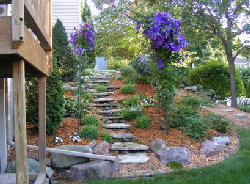
I prefer to add any compost, peat and topsoil that I need fairly evenly through the new bed, with the exception of any path and walking areas. That soil, including the sod, should be left undisturbed to make sure it holds well. You can add stepping stones later, or for a steeper hill you can add steps. Dump and spread amendments across the bed, then just start digging deep into your soil with a spade and turn it over. Then loosen clods and mix with a forked hoe. Smooth over with a steel rake. Continue to create soil berms and adding boulders or large rocks until you have created an interesting and natural looking surface that accommodates your plants well. You can also consider terracing the hill with boulder, block, or tie walls for a more structured look. Place your plants again to be sure of your where to dig planting holes and adjust as necessary.
If your slope is severe, now is the time to add a jute mat or even just roll out burlap. I don’t like to use landscape fabric, it encourages water to run over the surface when used on a hill. Water really needs to sit on the fabric and seep to work properly. I don’t use anything on my slopes, just heavy mulch. Sometimes the mulch will wash out but even during the heaviest of rains the soil stays put. The only exception is areas that take concentrated roof runoff. If you can’t take care of the problem with gutters and downspouts, lay out a relatively large piece of landscape fabric or jute to help disburse the runoff.
READY TO PLANT
The hard work is done, the planting is fun and pretty easy too. But first, a few quick pointers on selecting plants for a slope
Native plants are the absolute best for erosion control.
Evaluate the sun, a slope will receive sun more directly than a flat area. The sun will be hot and intense for the period the slope receives direct sun.
Unless you have substantially changed the grade of your slope, the soil will tend to be dry, look for drought tolerant plants.
At the bottom of a hill, cold air as well as water will settle. Just something to keep in mind. Early and late in the season plants may frost and will need to be more tolerant of occasionally moist soil.
Small plants are easiest to plant on a hill, a larger root ball can be partially exposed by the slant of the hill and will need to be dealt with.
Don’t be afraid to plant trees, bare root are usually easiest to place on a hill. The large root ball of a tree is also tricky on a hill. Very large balled and burlap really need a fairly flat spot for planting.
Now consider each plant and where it will be planted. On relatively flat terraces you can just plant as usual, especially smaller plants such as perennials and small shrubs. On steeper section you have a few options based on what exactly you are planting. Evaluate and adjust with a little common sense for each plant and situation.

Flat growing ground covers can be planted at an angle so that when planting is complete, it is positioned to spread flat over the ground. Just dig an angled hole and place the container in it frequently to adjust the angle of the hole as necessary. The top of the container soil should be level with the ground. On a pretty steep hill you will darn near be planting sideways. Flat growing ground covers are ideal for the steepest slopes.
Small potted perennials can be planted slightly angled so that the root ball can be completely covered. Even upright perennials are very good at growing straight up even when planted at an angle. I would not suggest planting at a severe angle, just slightly. The root ball on bedding plants is small enough that you can just pull soil up into a “mini berm” at the base of the plant to cover the roots.

Small shrubs can be planted at a slight angle if they the foliage tends to weep or cascade, or if they are low mounded shrubs such as a mugho pine. A low mounded shrub looks fine hugging the slope But many shrubs are really meant to be upright. If you have not created a terrace or flat spot for such shrubs, you can do it now. Plant the container upright and add soil to create a berm on the side where the roots are exposed.
For larger shrubs and potted trees, hopefully you have already created a terrace. If not you have a couple of options. Just pulling up a little extra soil will probably not be enough to cover the root ball and for large rootballs, there will likely just be too much sloped soil to hold while the shrub or tree establishes. Either create a terrace now with a few small boulders or large rocks, or make a temporary root collar. Just cut a wide strip of cardboard and wrap around the root ball after removing the plant from its container. Plant the collar with the rootball. The cardboard will protect the exposed portion of the roots while it grows roots deep into the soil. The exposed collar will slowly disintegrate as the roots that are not exposed establish. I don’t much care for this technique with a larger container plant. I did plant an upright conifer on a slight slope with this method and the “container form” is still there but the plant is doing just fine after more than 10 years. I just don’t like the look of it and constantly try to keep it covered with mulch. More recently I planted a rose on a hill and placed a curved cardboard “collar” a few inches out from the rootball at the edge of the planting hole. The cardboard protrudes from the ground level creating a little “wall”. I simply smoothed soil over the whole thing matching the slope. Gradually the cardboard will disintegrate and the soil may erode some, but I it will be easier to keep the new slope covered with mulch. It really is best to use small boulders so you have a terrace to plant on, even if it still has only a slight slope.
For bareroot trees, prepare a wide planting hole before you expose your tree roots to the elements, they really do not like being exposed. Nearly always there seems to be one side of roots that is lower than the other. Place the tree in the planting hole so the lowest side is downhill and you should be able to just cover with soil. If the roots are pretty level all around, I do not suggest planting your tree at an angle, it takes many many years for most trees to right themselves straight up. But, It takes a lot less time for the tree to adjust its roots to the conditions. Use a temporary collar on the downhill side a few inches from the farthest reaching root. As the roots establish and grow, they will quickly grow down to protect themselves. Bareroot trees seem to be even better at this than shrubs. Do NOT plant the trunk deeper than the original soil line on the trunk. Trees planted too deep will tend to snap in strong winds.
THE FINISHING STEP
Mulch! This is your last protection against surface erosion. Use a heavy mulching material that won’t blow away. Do not use rounded material that will roll down the hill. Shredded wood mulches are dense for their size and stay put pretty well. A cypress mulch decomposes slowly to minimize refreshing. Use a thick layer of mulch, up to 4 inches, and do not contact the stem of the plants or cover any foliage.
Finally, congratulate yourself on a job well done and enjoy your new landscaping!